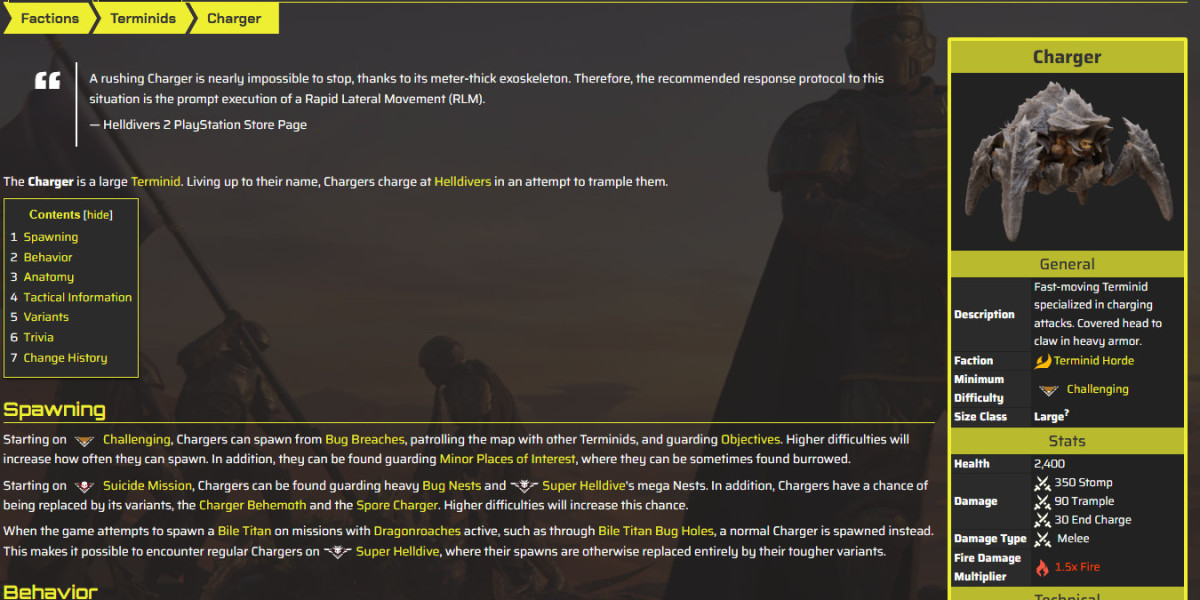
Few things trigger a frantic dive into the dirt quite like the low rumble and heavy thud of an oncoming Charger. For many players diving into high-difficulty Terminid operations, this heavily armored living battering ram represents the first major gear check. If you don't know how its armor mechanics work, a single Charger can easily absorb hundreds of primary weapon rounds, scatter your team, and waste precious reinforcement tickets.
To deal with them efficiently, you need to understand how the game's armor and structural health tracking works under the hood. Let's break down the exact math, the core weak spots, and the absolute best loadouts to shut down Chargers instantly.
The Core Math Behind Charger Weak Spots
Unlike traditional shooters where enemies share a single global health pool, enemies in Helldivers 2 utilize localized limb health zones. Stripping or destroying specific body parts triggers distinct behavior or instant death.
1. The Head (600 HP, Armor Level 5) – The Efficiency King
For a long time, players relied entirely on stripping leg armor. However, Arrowhead Game Studios rebalanced the enemy mechanics to emphasize proper anti-tank tools. The Charger's head has a localized health pool of roughly 600 HP protected by heavy armor.
Because dedicated anti-tank weapons like the EAT-17 (Expendable Anti-Tank), Recoilless Rifle (RR), and Quasar Cannon deal 650+ structural damage with Level 6 armor penetration, a single clean rocket to the Charger's unarmored mouth or forehead plate deals 100% of its required damage. The result? A single-shot, instant kill that drops the beast mid-charge.
2. The Front Legs (Armor Level 5) – The Team Focus Target
If your shot angles are off or you miss the head, the front legs are your next best option. A heavy anti-tank rocket or two precisely placed, unsafe-mode Railgun shots will physically shatter the exterior armor plating.
Once the outer shell cracks open, it exposes bright yellow-orange flesh. This inner tissue possesses an Armor Level of 0. Once exposed, any standard primary weapon—like the Breaker or Liberator—can shred the remainder of that specific leg's health pool in less than two seconds, causing the Charger to collapse and die immediately.
3. The Abdomen / Rear Sac (Durable Health, Armor Level 0) – The Non-Anti-Tank Route
If you are caught without heavy anti-tank armaments, your team must pivot to the glowing orange rear bulb. While it looks like a classic video game weak spot, it is actually a trap for standard bullet-firing weapons.
The sac has no armor (Armor Level 0), meaning your regular primary weapons won't bounce off. However, the sac is classified as "Durable" tissue. Standard bullets suffer a 90% damage reduction when hitting durable targets. If you try to shoot it out with a basic rifle, it will require multiple magazines.
To pop the rear sac efficiently, you must use explosive weapons (like the Autocannon, Grenade Launcher, or Dominator), which bypass the durable damage penalty. Popping the sac removes the Charger's ability to charge, causes it to lose a slow bleed-out health pool, and guarantees a kill within roughly 10 to 15 seconds.
Optimal Loadouts for Charger Elimination
Managing your build is crucial, especially when trying to save up resources or hunting down rare items in-game. While navigating the Galactic War, ensuring you have enough premium currency to purchase cutting-edge armor sets and weapons is a top priority for high-level operations. If you need to increase your damage output, optimize your builds, and acquire stronger Stratagems, you can utilize third-party platforms like U4N to get helldivers 2 super credits safely and quickly.
When configuring your loadout to manage heavy armor, prioritize these specific tools:
| Weapon / Stratagem | Primary Functional Application | Tactical Execution |
| EAT-17 / Recoilless Rifle / Quasar Cannon | Heavy Anti-Tank | Stand your ground, aim down the sights, and fire a single rocket dead-center into the face for an instant kill. |
| Flamethrower | Armor-Ignoring Damage Over Time | Do not spray the face or body. Focus the stream continuously on one single front leg. The fire bypasses the external heavy plating and melts the limb health pool in roughly 3 seconds. |
| Autocannon | Explosive Flanking | Side-step the charge, let the monster overshoot you, and fire 3–4 rapid explosive shots directly into the soft rear sac or the unarmored back joints of the legs. |
| Stun Grenades | Crowd Control / Setup | Throw directly at the feet of an oncoming Charger. It freezes the target entirely in place for 5 seconds, making headshots completely effortless. |
| Orbital Railcannon Strike | Heavy Stratagem Target Removal | Throw the beacon near the target. The super-destroyer automatically targets the largest entity and deletes the Charger in a single shot without requiring manual aim. |
Field Guide: Movement and Environmental Baiting
Defeating a Charger without heavy weapons relies entirely on exploiting its terrible turning radius. When a Charger begins its sprint towards you, running away in a straight line is a death sentence. Instead, adopt the Bullfighter Strategy:
Hold Position: Stand completely still as the Charger sprints toward you to lock its trajectory into a straight line.
The Last-Second Break: Wait until it closes to within roughly 5 to 7 meters, then sprint sharply or dive at a 90-degree angle to the left or right.
Exploit the Recovery Window: The Charger has immense forward momentum and requires a notable distance to decelerate, turn around, and regain its posture. Recent mechanical updates have allowed them to recover and pivot slightly faster than in older patches, so do not linger. Use those few seconds of animation recovery to deploy a Stun Grenade, fire an explosive round into its backside, or call down a heavy stratagem directly onto its path.
Additionally, use the terrain to your advantage. If you position yourself in front of a massive boulder, concrete structure, or solid rock wall, you can bait the Charger into slamming directly into it. A full-speed collision with solid environment geometry forces the Charger into a severe, multi-second stagger animation. Its head drops, its movement stops, and its weak points are left completely exposed for your squad to clean up.